User Guide
WiseFinder for Windows Phone - User Guide
Last Modified: December 11, 2011
How to use WiseFinder?
When WiseFinder is initiated the first screen shown is a Pivot view which holds two views: Log In and Sign Up. If you are already registered, then please skip the following steps until step number
3. If you have doubt regarding a specific function, you may use one of the following indexes:
Sign Up/Log In
WiseFinder Map
Adding and Removing Friends
Your Profile
Settings
Sign Up/Log In
1. In order to use the WiseFinder application, you must sign up and create your own exclusive account. Tap the Sign Up tag to reach the Sign Up screen where you can
specify the necessary information to create your account.

2. In the Sign Up screen, you will have to specify in the given textfields your full name, a valid email address, a username (this username is the unique name that will be shown
to other users, a sort of nickname), and a password. The Log In screen is loaded by default and can be reached if the user taps the Log In tag in the initial screen of the application. After all the information is specified,
press the Sign Up button near the bottom of the screen and you will automatically be redirected to the Log In screen.

3. In the Log In screen, write your account username and password in the given textfields, then press the Log In button.

WiseFinder Map
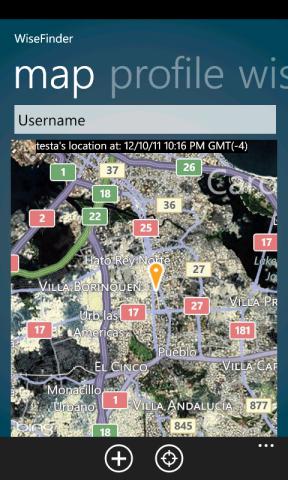
4. After you Log In successfully, you will see a new Pivot screen with a set of tags: map, profile and wisefriends. Bing Maps will load at the map view. The first time you log in will launch the background task which updates your position while not actively using WiseFinder. The WiseFinder Map is a Hybrid Map View. An empty textfield can be seen on the top of the screen where you can
write the username of one of your friends in WiseFinder and press the 'Enter' arrow key when done typing using the keyboard in order to display that friend's location. The friend's location is displayed with a yellow marker
on the map. You may tap markers on the map to find out which friend's position the marker represents and at what time was that update made. However to find a friend, you probably need one first. Your friends in WiseFinder must be added
through WiseFinder. In order to add a new friend, you must tap the '+' button on the Application Bar at the bottom. To immediately view your last updated position, you can tap the 'find me' button on the Application Bar at the bottom.
Adding and Removing Friends
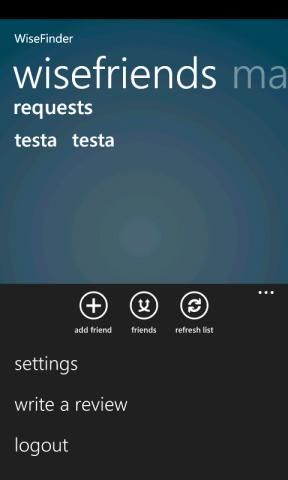
5. Tap the WiseFriends tab in order to reach the WiseFriends view.
6. In the WiseFriends screen, you will see an empty table on the screen. This list is your friends list. In order to fill this list up you must start adding friends by using the Add Friend
button near the bottom left of the screen ('+' button). When you press the Add Friend button a new window will pop up.

7. In this new window, write the username of your friend in the textfield. Afterwards, press the Add Friend button and a push notification will be sent to your friend requesting them to accept
you as a friend. You can't add friends without their consent in WiseFinder since you can track their location. Therefore they must accept your request and if you have enabled toast notifications on WiseFinder (through the Settings page), you will be notified when they do accept your invitation with
another toast notification.

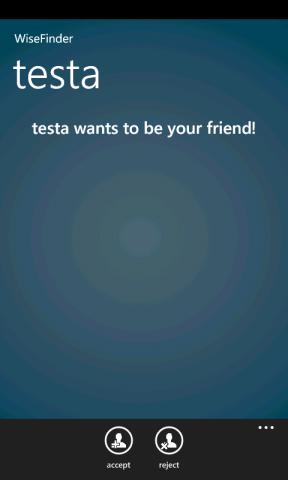
8. When your friend receives your request, he or she must go to the Request section of the WiseFriend screen on his or her application by tapping the toggle button (two arrows intertwined) located in the Application Bar. Doing so will present your pending friend requests. Your name will appear on the Request section of your friend's application. Each time you press the toggle button, you will toggle between your friends list and your friend requests (you will notice the list name changes each time you tap the toggle button). By tapping the refresh button on the Application Bar, you will refresh the list currently being displayed. Also, each time you enter the wisefriends view both friend list and friend requests are refreshed.

In order to accept your request, your friend must tap your name in the Request section. A new window will pop up with two buttons on the Application Bar: Accept or Reject.
Your friend must press the Accept button to accept your request and add you as a friend. If he or she presses the Reject button, your request will be denied and
you won't be able to locate him or her.
9. After you add a friend, you will be redirected to the WiseFriends screen and you will notice your friend in your friend list if the request was accepted.
10. When your friend accepts your request, a toast notification will be sent to you (if enabled at the Settings page) and your friend's username and name will appear on your WiseFriend list.
11. In order to rapidly find your friend's location from your WiseFriend screen, you just have to press the yellow arrow button to the right of your friend's username.
After you press the yellow arrow, you will be redirected to the WiseFinder Map screen and your friend's location will appear immediately.
12. If you want to remove a friend, you just have to press the friend's username in the WiseFriend screen and a new window will pop up. This window holds three Application Bar buttons: wisefind (for searching for your friend), pin (to place a tile on your Windows Phone start screen representing your friend and that by clicking the tile you will be directed to the map view and be shown your friend's position), and Remove
Friend. Tap the Remove Friend button and you will be redirected to the WiseFriend screen from which your friend has been removed.

Your Profile
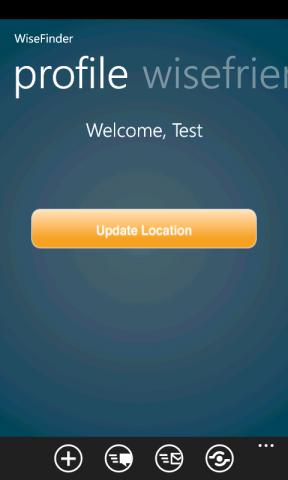
13. The Profile tag takes you to your Profile screen where, apart from your full name, you can see the manual update position button and various buttons on the Application Bar. The Update Position button allows you to manually
update your position uploading it to the WiseFinder database. GPS on Windows Phone caches your location (when location services are enabled) every 15 minutes. When you tap the update position button, you will either update your position with your most recent cached position or if it is able to determine your current position, it will update using that value. Background updates will also use your most recently cached position but only updates every 30 minutes. If at any time you wish to stop updating your position, you may logout by tapping logout on the Application Bar item options or by pressing the 'back' hardware button on your Windows Phone while on the main WiseFinder pivot screen.
14. The Profile screen has several sharing functions on the Application Bar to let your friends know about WiseFinder and have them join and find you. You can share WiseFinder through sms, email and through your Windows Phone's integrated social networks. Tap the corresponding sharing option if you wish to invite more friends to WiseFinder. The default message follows the following format: "I'm trying out WiseFinder, a great new way to find and
keep track of your family and friends. When using WiseFinder, add me to your friends list by searching for username: (your username will be displayed). Learn more at http://mywisefinder.com".
WiseFinder Settings
15. On the Settings Page you can enable toast notifications to be notified when you receive friend requests and when your invites are accepted by friends. Once you toggle toast notifications to 'Enabled' you will be notified about your account being registered for toast notifications on your current device. If using multiple accounts on your device, you must toggle and re-enable toast notifications for each account to register each account to your device.
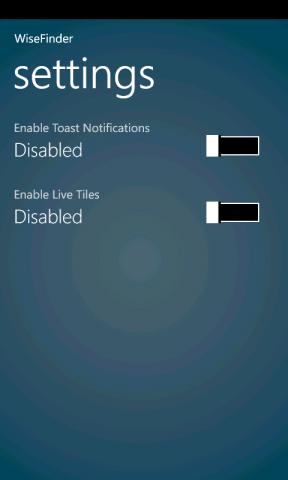
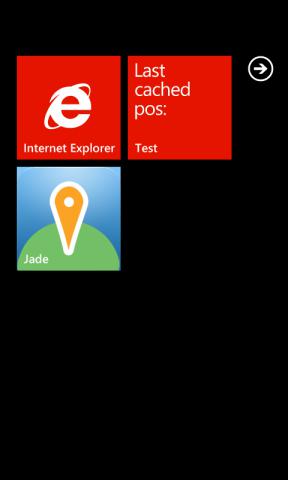
16. Enabling Live Tiles will make the main WiseFinder application tile display live information regarding the last cached position on the back of the tile (you must pin WiseFinder to the start screen to view the live tile information).